ManicTime v2.3 changes
What's new in this version:
- Central server repository for tags
- Tag picker
- Autotag improvements
- Timesheet improvements
- Tag editor improvements
- Setup improvements - Deploying preconfigured ManicTime to multiple users
- Rename tags on the advanced search
- Add tag window, option to use shorter notation for hours
- Dragging over the hour bar will snap to minutes, not seconds
- Time selection now also shows seconds, not just hours and minutes
- Outlook tracker plugin
- Disable Away pop up when stopwatch is running
- Previously used notes view will first display notes, which were previously used with the currently entered tag
- Add tag without selection will default to the currently selected date in the Day view. It will also round to the nearest minute
- Zoom by mouse scroll over zoom area
- Average time added in statistics
- Bug fix: Right click menu on tracker was not translated
- Bug fix: Default language didn’t work
- Bug fix: hint on running stopwatch
- Bug fix: When installing or upgrading sometimes 'Creating database' window would still remain visible after ManicTime started
- Bug fix: 'Include notes' on timesheet was case sensitive, now it is case insensitive
- Bug fix: Away view, 'Never show this again' setting is now saved even if you press cancel
- Bug fix: Clicking on selection on timelines generated a 0 length selection
- Bug fix: Day duration chart, AM PM clipped, now it only shows HH:mm
Central server repository for tags
When we introduced ManicTime Server, it became possible to share tagged time between users, but there was a problem with it. In order to create a report for multiple users, everybody had to use the same tags. Now there is a way to add tags to the server, which will show up on every client connected to that server.To set tags on the server, visit the server with the browser, then go to Tags tab (you need to be an Admin on the server to see it)
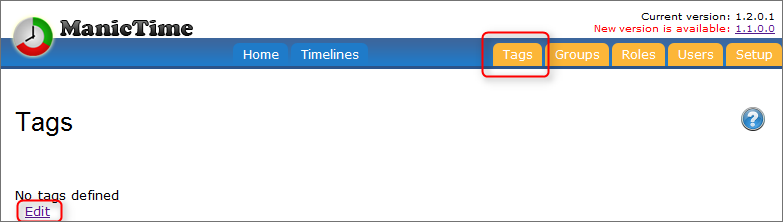
|
| Server shared tags page |
- From a file
- Using a service
- Or manual entry
Here I’m using manual entry. Each tag combination must be on its own line.
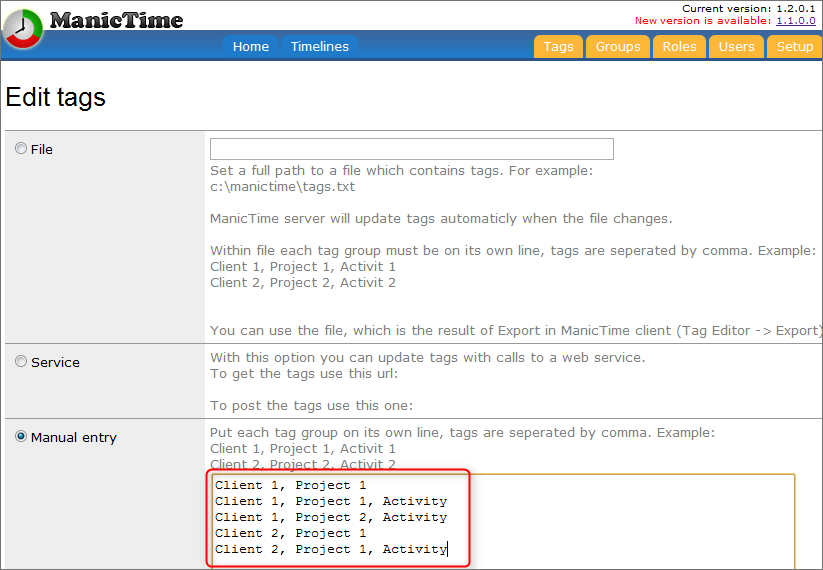
|
| Edit tags on the server |
Once this is set, click Submit to save.
Next open up ManicTime and go to Tools and settings - Server manager and click on Add server to start a wizard:
- Set Url to the server and credentials
- Select which timelines you would like to publish to the server
-
Choose what to do with server defined tags. You have three options:
- Download tags and show them as regular tags
- Download tags but highlight tags from the server
- Allow only tags from the server
I’ll choose Allow only tags from the server. Once the server is added, you can see its status in the bottom part of MT.
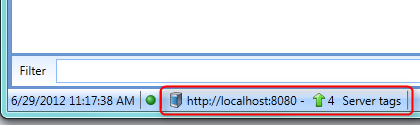
|
| Server status |
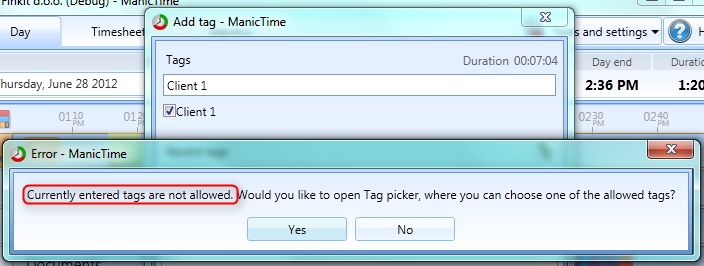
Here I’m using a fresh installation of ManicTime, so there are no pre-existing tags. Notice that when I go to tag some time, the tags I entered on the server are already suggested.
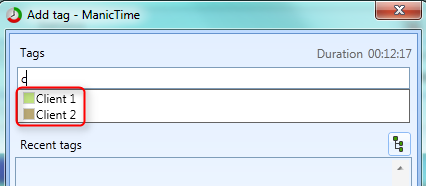
|
| Tags from the server are suggested on the client |
|
| Current tags are not allowed warning |
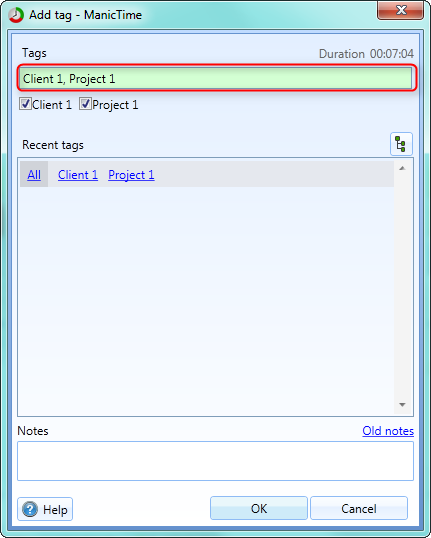
I get a message saying this is not a valid tag. Why is that? Remember when I added a server, I chose the third option - Allow only tags from the server. Let's look at the tags I defined on the server again:
Client 1, Project 1
Client 1, Project 1, Activity
Client 1, Project 2, Activity
Client 2, Project 1
Client 2, Project 1, Activity
Client 2, Project 2, Activity
Notice that 'Client 1' is not among them. I can however tag 'Client 1, Project 1'. Or if I wanted to tag as 'Client 1', I would need to put 'Client 1' on its own line on the server tag list. Once the correct tag is entered, the textbox gets a greener background.
|
| Once I entered allowed tag, textbox background turns greener |
There is one more thing to be aware of. ManicTime will only check for the starting tags, so ‘Client 1, Project 1’, however you can add anything after that. For example ‘Client 1, Project 1, Design’ is also valid. Let's say that I added ‘Lunch’ on the server on its own line. On the client I can now create tags like:
Lunch, Restaurant
Lunch, McDonalds
Lunch, Chinese
…
Tag picker
For easier overview of available tags we added a Tag picker view. It is a hierarchical representation of the tags. So given these tags:Client 1, Project 1
Client 1, Project 1, Activity
Client 1, Project 2, Activity
Client 2, Project 1
Client 2, Project 1, Activity
their hierarchical representation would be:
Client 1
Project 1
Activity
Project 2
Activity
Client 2
Project 1
Activity
To launch Tag picker click on a tree like icon in the Add tag window
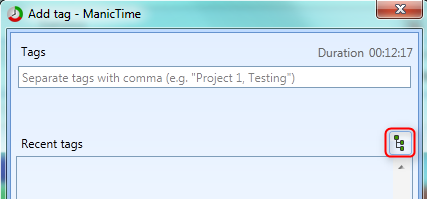
|
| Click to open Tag picker window |
On the first level there will only be Client 1 and Client 2. Once you click on Client 1, you will get an option for Project 1 and Project 2. At the top there is breadcrumb control showing where you are in the hierarchy. Once you select allowed tag, breadcrumb control will have a greener background (only when Allow only tags from the server option is used. Otherwise all tags are valid).

|
| Tag picker |
Tag picker is not related to the server and you can use it even if there are no servers defined. It is however very useful when server tags are used, because it offers an easy discovery of server defined tags.
Autotag improvements
Add to autotag shortcut is always visible
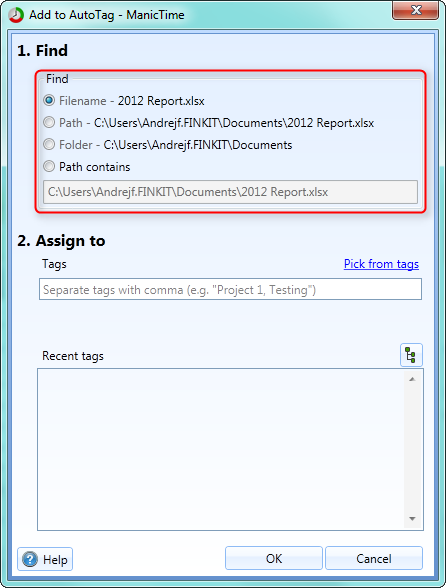
Add to autotag shortcut is always visible, even when autotag timeline is not used. If AutoTag timeline is not on Day view, it will ask you if you want to add it.Customized Add to autotag windows based on file type
If you are adding a web rule you will get a different Add to autotag window than if you are adding a file rule.
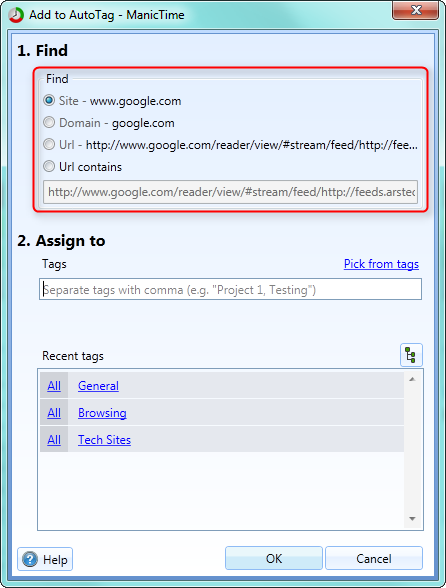
|
| Adding a web rule |
|
| Adding a file rule |
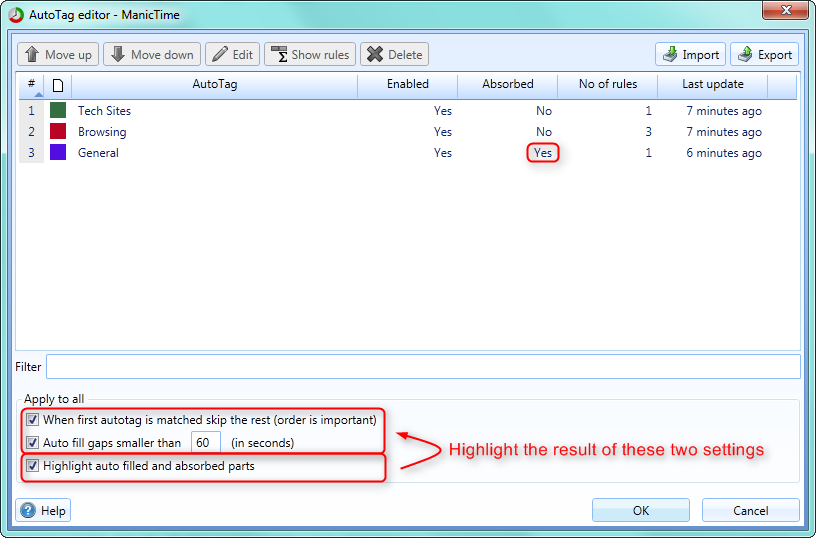
AutoTag Editor
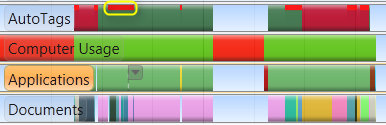
Autotag editor has been rewritten. The functionality is pretty much the same, but hopefully it will be easier to use. The one thing we added is Highlight auto filled and absorbed parts setting found at the bottom. Those of you who use auto fill and absorption probably know that absorbed and auto filled parts could be right or wrong. It is more or less a guessing game, where correctness depends on your rules, but in can never be 100% correct. The Highlight auto filled and absorbed parts option will reveal these parts on the day view, so you can see which parts were guessed. Then you can add additional rules when needed.
|
| Highlight filled and absorbed parts option |
|
| Highlighted filled and absorbed parts on day view |
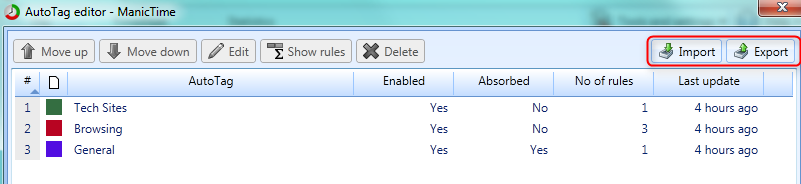
Autotags export and import
You can now export and then import autotags on a different machine.
|
| Export/import of autotags |
Timesheet improvements
More preconfigured date ranges
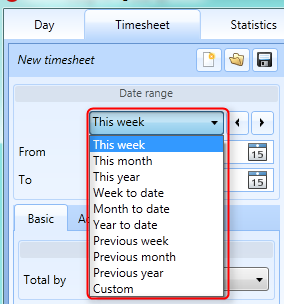
|
| Timesheet - more preconfigured date ranges |
Timesheet rounding to .1
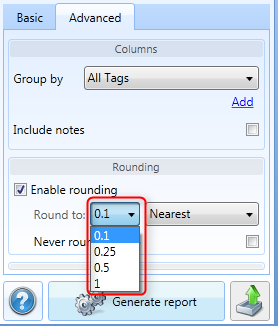
|
| Timesheet rounding to .1 |
When saving timesheet for later use, you can now optionally save date range as well
In previous versions, when you saved a timesheet in previous versions, it saved all the settings except the date range. Now you have an option to save the date range as well, which means that the next time you load a timesheet, date range will also be updated.
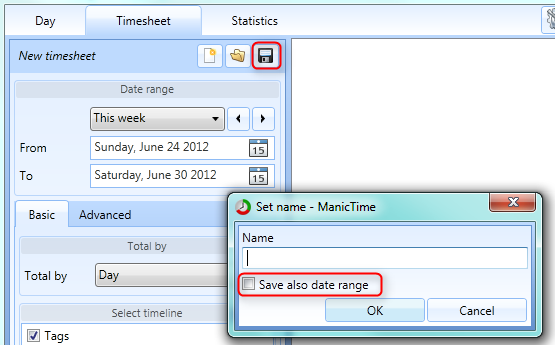
|
| Timesheet - Save date range option |
Delete saved timesheets
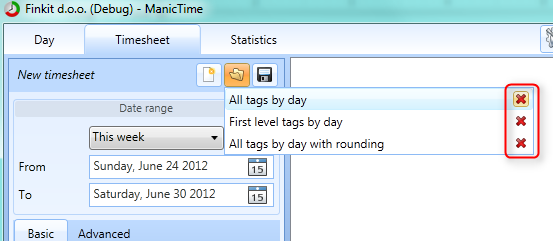
|
| Delete saved timesheets |
Quickbooks export
There were a lot of requests for Quickbooks export and we tried our best to make it as useful as we could. You can find it under exports button, it becomes active once you generate a timesheet.
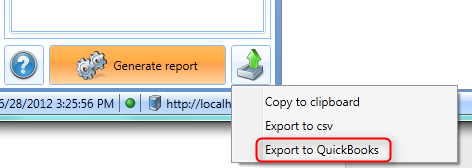
|
| Timesheet - export to Quickbooks command |
- Leave empty
- Custom value - When this is chosen you can enter some text which will be the same for all the rows.
- First level tags - In tag 'Client 1, Project 1, Activity 1', Client 1 is the first level tag
- Second level tags
- Third level tags
- Fourth level tags
- Notes
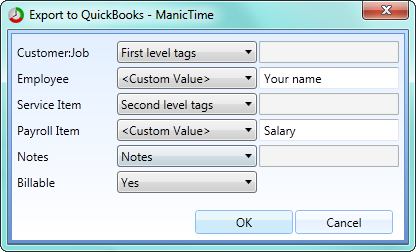
|
| Timesheet - export to Quickbooks view |
Tag editor improvements
Tag import/export
You can now export and import all your tags. This can be done in Tag editor. Tags are exported to a txt file, each tag combination is on its own line. You can also use exported text file as input for tag repository on the server.
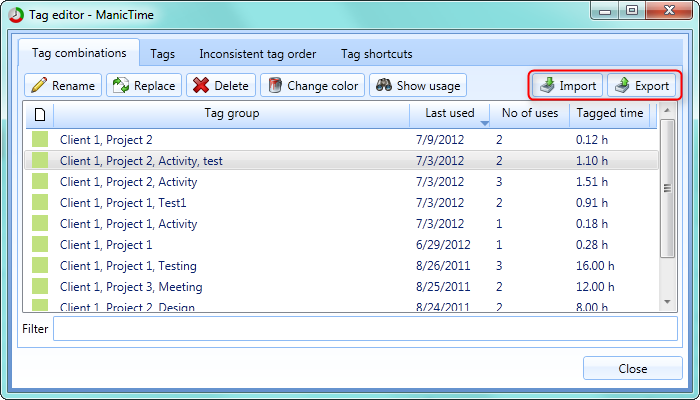
|
| Tag editor - import/export |
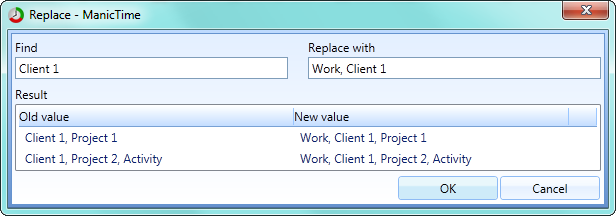
Tag replace
Use tag replace when you want to rename multiple tags. Let's take a look at an example. My tag combinations are displayed on the image below
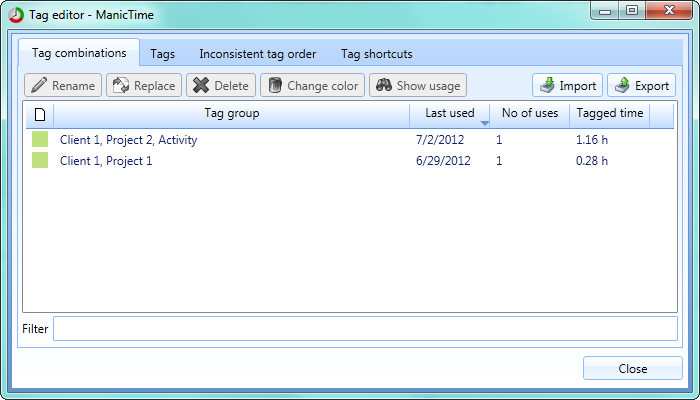
|
| Tag editor - Tag combinations |
| Old name | New name |
| Client 1, Project 2, Activity | Work, Client 1, Project 2, Activity |
| Client 1, Project 1 | Work, Client 1, Project 1 |
|
| Tag editor - Replace window |
Setup improvements - Deploying preconfigured ManicTime to multiple users
Up until now there was no way to deploy ManicTime to multiple machines with preconfigured settings. To deploy ManicTime to multiple machines you need ManicTime.msi file, which you can get on our download page. Then you need to create ManicTimeSettings.xml which needs to be in the same folder as msi.The easiest way to get ManicTimeSettings.xml is to use the server. On the server go to Setup tab and choose the options you want. When you are done click on Create file to get the ManicTimeSettings.xml. Put it in the same folder as msi.
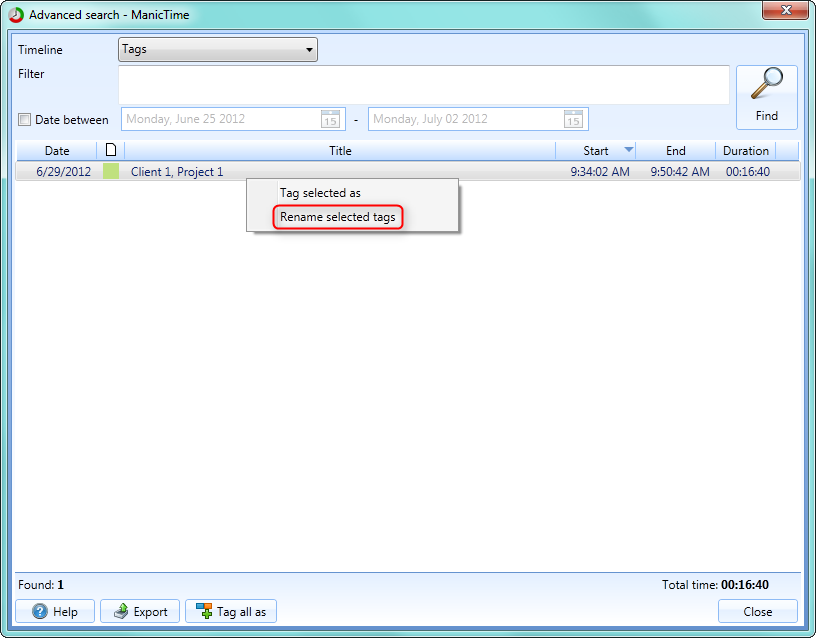
Rename tags on the advanced search
You can now rename tags on Advanced search. You can do this by selecting Tag timeline, then write a filter. Once the results are loaded select some lines with Shift-click or Ctrl-click, then right click on selection and choose Rename selected tags.
|
| Advanced search - rename selected tags |
Add tag window, option to use shorter notation for hours
You can now use these shortcuts for the hours on Add tag view:135p -> 1:35 PM
1335 -> 1:35 PM
800 -> 8:00 AM
2300 -> 11:00 PM
...
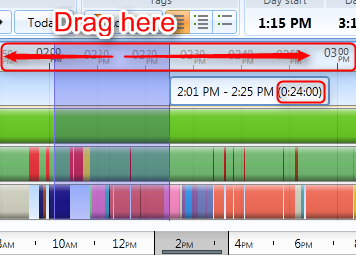
Dragging over the hour bar will snap to minutes, not seconds
While dragging on the timelines, if you move the mouse over the hour bar and drag there, it will snap to minutes, not seconds
|
| Dragging over hour bar will snap to minutes |
Time selection now also shows seconds, not just hours and minutes
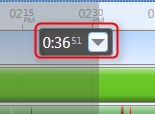
|
| Time selection also shows seconds |
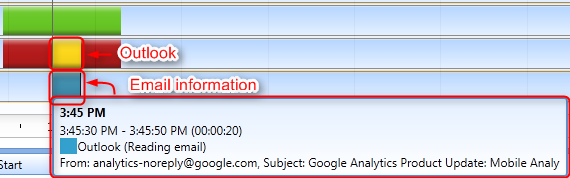
Outlook tracker plugin
Plugins are used to gather the data displayed on the Documents timeline. Up until now we had plugins for most of Office apps, but not for Outlook. Outlook plugin will show which email you were reading or writing as well as if you are using a calendar, tasks...
|
| Outlook plugin on Documents timeline |
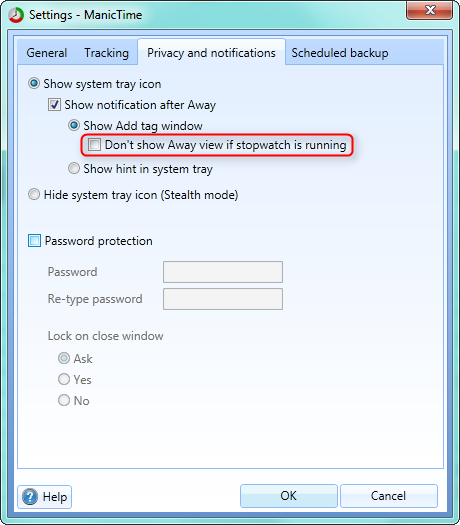
Disable Away pop up when stopwatch is running
Usually when you use a stopwatch you are already working on something, so the Away pop you receive when MT comes from Away is unneeded.
|
| Don't show Away view while stopwatch is running setting |